Operational efficiency in plastics manufacturing directly drives profitability and product yield. Consistent machinery performance allows facilities to maximize output and reduce costly material waste. For plant managers and procurement teams, grasping operational complexity is a vital step. You evaluate new equipment purchases based on these exact operational realities. You must understand required labor skills and daily startup procedures. Thorough knowledge ensures you make informed, risk-free purchasing decisions. Ignoring these operational factors often leads to unforeseen downtime. We designed this guide to provide a transparent standard operating procedure baseline. It highlights realistic implementation workflows for your facility. We cover mandatory safety requirements and proven operational best practices. You will learn exactly how to prepare, start, monitor, and safely shut down your equipment. This ensures long-term reliability and peak daily performance. Mastery over these steps transforms unpredictable production into a highly stable process.
Key Takeaways
- Proper pre-heating and parison calibration dictate the success of the entire production run, minimizing scrap rates.
- Standardized shutdown procedures are as critical as startup to prevent resin degradation and protect the die head.
- Modern EBM equipment evaluation should heavily weigh Human-Machine Interface (HMI) usability and automated Parison Wall Thickness Control (PWTC) to reduce reliance on highly specialized operator intervention.
Pre-Operation Preparation & Safety Verification
Preparation establishes the foundation for a successful production shift. You must verify several baseline facility requirements before applying power to the equipment. Rushing this stage often causes mechanical faults. Proper checks eliminate many common errors before they occur.
Facility & Utility Checks
Utility stability directly influences molding precision. Operators must confirm all vital inputs function correctly. Check the cooling water system first. You need adequate pressure and flow directed to both the molds and the feed throat. Next, verify the compressed air lines. Air pressure (PSI) must remain stable to guarantee consistent bottle expansion. Finally, inspect the hydraulic system. Low hydraulic fluid levels can cause erratic carriage movements. Replenish any depleted reservoirs immediately.
Material Readiness
Resin preparation varies heavily based on the chosen polymer. Hygroscopic materials like PETG absorb ambient moisture. They require strict drying parameters inside a dehumidifying hopper. Standard polyolefins like HDPE and PP are less critical regarding moisture. However, staging remains important. You must confirm the correct ratios when mixing virgin resin, colorants, and regrind. Poor mixing leads to color streaking and weak structural walls.
Safety & Compliance Protocols
Industrial machinery presents inherent thermal and mechanical risks. You must enforce rigorous safety verification daily. Inspect all safety interlocks and light curtains around the clamping unit. Ensure the emergency stop (E-stop) buttons function instantly upon activation. Facilities must comply strictly with OSHA and ISO machinery safety standards. Pay special attention to pinch points and exposed high-temperature zones. Never bypass safety gates to speed up production.
Tooling Inspection
A pristine mold ensures high-quality part replication. Operators should visually inspect the mold cavities. Look for residual plastic from the previous shift. Clean any debris using approved non-abrasive tools. Examine the blow pins and cutting rings for signs of wear. Damaged cutting rings leave ragged neck finishes. Verify alignment across all moving components to prevent catastrophic mold crashes.
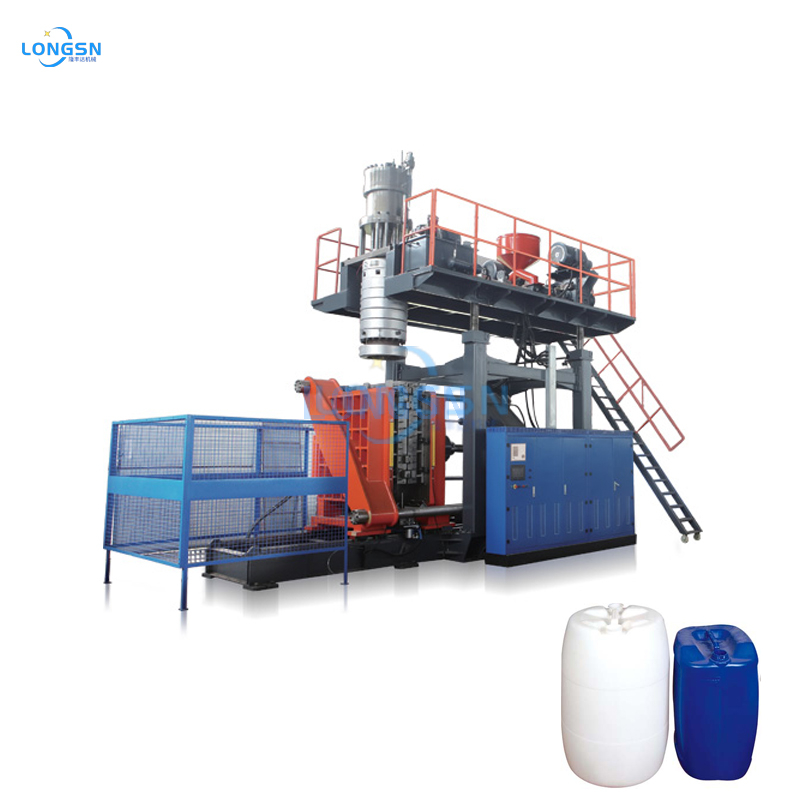
Starting the equipment requires a sequential, disciplined approach. Rapid heating or sudden mechanical engagement will damage expensive components. Follow these steps to ensure a smooth transition into active manufacturing.
1. Thermal Profiling & Heating
You must establish the correct temperature profile across the entire extrusion path. Power on the heating zones sequentially. Start from the barrel feed zone and move toward the adapter and die head. Avoid applying full heat instantly. Implementation reality requires a mandatory "soak time." Wait 30 to 60 minutes after the controllers reach their set points. This ensures uniform thermal expansion inside the barrel. Skipping soak time often causes extruder screw shearing.
2. Extruder Startup & Purging
Begin rotating the extruder screw at the minimum possible RPM. Gradually introduce the resin. You must purge out any old, degraded material residing in the barrel. Watch the extrudate as it exits the die head. Continue purging until the molten plastic flows completely clean. The melt must be entirely free of bubbles, carbonized black particles, and un-melted resin chunks.
3. Parison Programming Setup
The parison forms the backbone of your molded product. Access the equipment's Human-Machine Interface (HMI). Input your target weight and length parameters. Next, calibrate the Parison Wall Thickness Control (PWTC) profile. Complex bottle geometries require precise material distribution. The PWTC allows you to push more plastic into corners and less into flat sidewalls. This optimization prevents weak spots while saving raw material.
4. Mold Synchronization
Mechanical synchronization prevents costly tool damage. Keep the system in manual or dry-cycle mode initially. Engage the clamp and carriage sequence slowly. Observe the closing action. You must verify blow pin alignment relative to the mold neck opening. Misalignment will crush the blow pin. Once aligned, calibrate the blowing pressure and timing. Ensure the pin descends only after the mold fully clamps the parison.
Active Production Monitoring & Quality Control
A successful startup transitions directly into continuous monitoring. Automated systems handle the physical repetition. Operators must manage process stability and part quality. Minor thermal shifts can ruin an entire production batch.
Transition to Auto-Mode
Do not jump immediately to full production speed. Gradually shift the Extrusion Blow Moulding Machine from semi-automatic to fully automatic cycling. You should isolate and monitor the first 10 to 20 shots closely. Discard these initial parts as scrap or regrind. Wait until the thermal rhythm stabilizes. Consistent parison drop times indicate the system is ready for normal operation.
Cycle Time Optimization
Maximum output depends on perfectly balanced cycle times. Operators must balance three primary variables. First, adjust the extruder RPM to match parison delivery needs. Second, dial in the cooling time inside the mold. Third, optimize the exhaust time before the mold opens. Pushing the machine too fast compromises structural integrity. Parts ejected too hot will warp on the conveyor belt.
In-line Quality Evaluation Criteria
Quality assurance requires continuous sampling. Operators should evaluate products at regular intervals. Use standardized testing to prevent defective shipments.
In-Line Quality Inspection Criteria | Quality Metric | Inspection Method | Target Outcome |
| Top-Load Strength | Compression testing machine | Resists stacking weight without buckling. |
| Drop Impact Resistance | Controlled height drop test | No cracking or bottom seam splitting. |
| Deflashing Efficiency | Visual inspection | Clean tail and neck trimming. No jagged edges. |
| Weight Consistency | Digital scale sampling | Strict adherence to target weight to avoid material give-away. |
Safe Shutdown Procedures to Protect Equipment
Shutting down improperly destroys resin and damages the die head. Polymer left baking inside a hot barrel degrades rapidly. It forms carbon deposits. These deposits ruin subsequent production runs. Standardized shutdown procedures protect your investment.
Temporary Pauses vs. Full Shutdown
You must differentiate between short idle times and end-of-week shutdowns. A temporary pause requires a different approach. Lower the heat profiles slightly to prevent burning. Maintain screw rotation intermittently. A full shutdown requires a complete thermal and material purge sequence.
Chart: Operational State Comparison | Condition | Heater Status | Cooling Status | Mold Position |
| Short Pause (< 1 Hour) | Lowered by 20-30°C | Active | Open |
| Full Shutdown | Powered Off | Active until < 100°C | Open and lubricated |
System Purging
Certain materials demand immediate removal. Heat-sensitive materials like PVC will produce corrosive gases if left inside a hot barrel. Introduce a commercial purging compound. Alternatively, use a high-melt-flow natural resin. Push out all colorants and sensitive polymers. This prevents degradation and carbon buildup inside the complex die head channels.
Cooling Sequence
Thermal management continues even after production stops. Shut off the extruder heaters. However, you must maintain cooling water flow. Keep the water circulating until the barrel temperature drops below critical degradation thresholds. Once cool, turn off the water to prevent internal condensation. Leave the mold in an open position. Coat the cavity surfaces using a rust preventative spray if taking the tool offline for extended periods.
Troubleshooting Common Operational Defects
Defects happen even in optimized facilities. Quick identification and resolution separate profitable plants from struggling ones. Active troubleshooting frameworks reduce material waste. Here are the most common defects and practical solutions.
- Wall Thinning / Uneven Distribution: Parts often thin out around corners. Check the die gap concentricity first. Adjust the PWTC profile to push material to the thin spots. You should also inspect the die head for uneven temperatures. A cold spot on the die will restrict flow.
- Poor Weld Lines (Pinch-off Failure): The bottom tail sometimes splits open. This indicates pinch-off failure. Evaluate your mold closing pressure. You may need to increase the mold pinch-off sharpness. Slightly increasing the melt temperature can also improve weld line fusion.
- Surface Defects (Melt Fracture / Sharkskin): Rough, scaly exterior surfaces ruin product aesthetics. This phenomenon is called sharkskin. Reduce your extrusion speed to lower shear stress. Adjust the die head temperature upward. You must also verify the resin melt flow index (MFI) matches your equipment capabilities.
- Excessive Shrinkage/Warpage: Bottles pulling inward after ejection indicate thermal shock. Extend the in-mold cooling time. Check the mold cooling channels for restricted water flow. You can also optimize the internal blowing pressure to hold the plastic firmly against the cold mold walls.
Evaluating EBM Equipment: How Operation Impacts Production Margins
Operational simplicity drives factory floor profitability. High operator turnover poses a massive risk to production margins. Training new staff becomes incredibly expensive if your machinery is overly complex. You must evaluate equipment based on everyday usability.
Intuitive HMI & Automation
Complicated interfaces frustrate operators and cause input errors. Look for machines featuring intuitive touchscreen HMIs. Recipe-saving capabilities are mandatory. They allow operators to load entire thermal and parison profiles instantly. Visual troubleshooting guides built into the controller drastically lower the operator learning curve.
Component Accessibility
Maintenance speed directly affects machine uptime. Evaluate how easily maintenance teams can access critical components. They must access the extruder screw, change die heads, and swap molds safely. Prioritize systems utilizing Quick Mold Change (QMC) mechanisms. These mechanical upgrades reduce changeover downtime from hours to minutes.
Predictive Maintenance Integration
Modern equipment warns you before breaking down. Prioritize machines equipped with IoT sensors. These sensors alert operators to hydraulic pressure drops instantly. They flag heater band failures before catastrophic downtime occurs. Active monitoring prevents small anomalies from becoming major mechanical failures.
Next-Step Actions
Reading specifications only provides partial insight. You must interact with the equipment. Recommend booking a technical run-off. Request a localized demo to evaluate the HMI responsiveness firsthand. Assess the mechanical accessibility alongside your maintenance team to guarantee long-term viability.
Conclusion
Mastering the operation of an Extrusion Blow Moulding Machine requires discipline. Success demands a blend of rigorous safety checks, precise thermal management, and active quality monitoring. Operators must respect the required soak times and execute standardized purging sequences. Investing in high-quality machinery equipped with modern, automated controllers drastically simplifies these standard operating procedures. The right technology minimizes the operator learning curve and maximizes daily yield. We encourage you to consult with your engineering team today. Discuss your specific production requirements and material needs. Request a detailed machine specification sheet, or schedule an operational demonstration to see these advanced systems in action.
FAQ
Q: How long does it take to train an operator on a new machine?
A: Traditional mechanical systems often required months of hands-on training. However, modern equipment features intuitive touchscreens and automated recipe-saving functions. These advanced HMIs provide visual guides and automated sequences. This technology effectively reduces the primary learning curve from several months down to just a few weeks.
Q: What is the most critical parameter to monitor during operation?
A: Melt temperature remains the most critical parameter. It directly dictates the viscosity of the parison. If the temperature fluctuates, the parison sags or shrinks unpredictably. Stable thermal control ensures your Parison Wall Thickness Control (PWTC) program functions accurately and prevents material waste.
Q: How do we safely change materials or colors during production?
A: Changing materials requires a dedicated purging process. You must lower the extruder RPM and introduce a commercial purging compound or natural resin. This pushes out the previous colorant completely. The expected downtime varies between 30 to 90 minutes, depending on the complexity of your die head.
Q: Can operational settings be saved for different molds?
A: Yes. Modern programmable logic controllers (PLCs) offer extensive recipe-storage capabilities. You can save specific temperature profiles, PWTC setups, and cycle times for dozens of different molds. This automation supports fast changeovers and eliminates manual data entry errors during startup.

 English