Acquiring a Blow Moulding Machine is only the first step toward production success. Achieving high returns depends entirely on standardized operational procedures, precise calibration, and operator competence. Unstructured operations often lead to high defect rates. You might see uneven wall thickness, compromised safety protocols, and accelerated equipment wear. These daily issues disrupt production timelines and increase material waste. Poorly managed workflows also strain your facility utility systems unnecessarily.
This guide breaks down the exact standard operating procedures you need to succeed. We explore essential environmental prerequisites and practical troubleshooting frameworks. You will learn how to safely and profitably run your equipment day after day. Finally, we provide a structured method for evaluating machine complexity before you commit to a purchase. Mastering these operational steps ensures you maximize yield while protecting your capital investment. Let us dive into the critical workflows.
Key Takeaways
- Preparation is critical: Safe operation requires strict pre-run utility checks covering pneumatics, cooling systems, and electrical compliance.
- Calibration dictates yield: Balancing melt temperature, blow pressure, and cooling time is essential to minimizing cycle times without compromising structural integrity.
- Defect mitigation is a daily reality: Most operational issues (flash, warping, weak seams) stem from minor parameter misalignments rather than mechanical failure.
- Usability impacts profitability: When evaluating machines, the intuitiveness of the Human-Machine Interface (HMI) and the availability of vendor training are just as vital as mechanical specs.
Pre-Operation: Facility Requirements and Machine Inspection
Before you start a Blow Moulding Machine, strict environmental and safety checks are mandatory. Facility readiness directly impacts your final production quality. You cannot achieve stable operations without reliable utilities. First, verify your air compressor output and receiver tank capacity. Consistent high-pressure air is necessary for uniform blowing. Pressure drops during the cycle will cause incomplete bottle formation.
Next, check the industrial chiller lines. You must ensure proper water circulation for the mould cooling system. Verify the water temperature and flow rate at the manifold. Inadequate cooling extends cycle times and causes parts to warp upon ejection. Also, confirm your raw material drying systems work correctly. Moisture-sensitive polymers like PET demand thoroughly dried resin pellets. If you skip this, moisture turns into steam during melting. This creates severe structural flaws and cosmetic streaks on the final product.
Safety compliance protects your operators and equipment daily. Always test emergency stop buttons and safety gates before powering up. Never bypass a safety interlock to save time during a shift. Verify your heating zone thermocouples and pressure sensors. They must report accurate data to the main control panel. Faulty sensors lead to burned material or dangerous over-pressurization inside the extruder barrel.
Finally, establish a solid mechanical baseline. Inspect all moulds for residual plastic from previous runs. Even a tiny piece of hardened resin will indent the next part. Ensure you properly lubricate the toggle and clamping mechanisms. Dry joints wear out quickly and cause the mould to close unevenly. Check the extruder screw alignment to prevent uneven material flow. Misalignment forces the drive motor to work harder, wasting energy and risking mechanical failure.
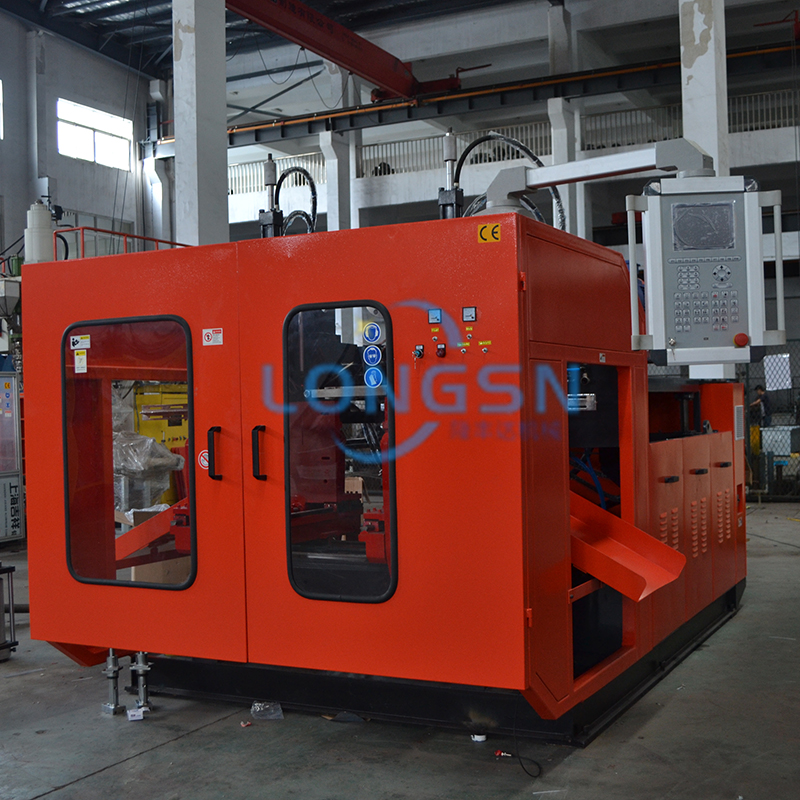
The Core Workflow: Step-by-Step Operation of a Blow Moulding Machine
Operating a Blow Moulding Machine follows a precise, objective sequence. You must master each phase to ensure consistent product quality. Skipping steps or rushing transitions always results in wasted material and poor yields.
- Material Feeding and Melting: First, load the hopper with resin pellets and required colorants. You must set the extruder barrel temperature zones carefully. The goal is to melt the polymer gradually. If the rear zones are too hot, the plastic bridges in the feed throat. If the front zones are too cold, unmelted particles will clog the die head.
- Parison or Preform Generation: For Extrusion Blow Moulding (EBM), you extrude a molten plastic tube called a parison. You can do this continuously or use an accumulator head for larger industrial parts. For Injection Stretch Blow Moulding (ISBM), the process differs. You reheat a solid preform or transfer it directly from an injection cavity.
- Mould Clamping and Inflation: The mould closes firmly around the parison or preform. The clamping force must be high enough to pinch off the plastic cleanly. A blow pin inserts into the material. It introduces high-pressure air. This rapidly forces the plastic outward against the chilled cavity walls.
- Cooling Phase: Chilled water runs through dedicated mould channels. This rapidly solidifies the newly formed plastic. The cooling phase usually takes up the majority of the overall cycle time. Note: Rushing this step increases output but severely risks part warping. If the plastic remains soft, it shrinks unevenly after machine ejection.
- Deflashing and Ejection: Finally, the mould opens. The machine ejects the finished part onto a conveyor or drop chute. In EBM, you must trim excess plastic, known as flash. You can remove flash manually for low volumes. For high-speed lines, you utilize automated downstream equipment to punch away the scrap efficiently.
Parameter Setting and Calibration: Aligning Features with Outcomes
Operators manipulate specific features on a Blow Moulding Machine to hit exact production targets. Machine calibration requires extreme patience and data tracking. You cannot rely on guesswork when dealing with complex, molten polymers.
Temperature profiling is a critical first step. You must stagger heat zones along the extruder barrel. This prevents material degradation while ensuring a perfectly homogenous melt. The feed zone should remain relatively cool. The compression and metering zones gradually increase in heat. Finally, the die head maintains a precise temperature to control the parison's drop speed.
Blow pressure and timing require exact pneumatic adjustments. You control the rate and volume of air injection. If you inject air too fast, you trap air pockets and cause surface defects. If you inject it too slowly, the plastic cools prematurely. This leads to incomplete forming, particularly in the sharp corners of square containers.
Wall Thickness Control (WTC) or Automated Parison Control (APC) optimizes your material usage. These advanced systems let you program thickness variations along the product's vertical length. They actively push or pull the die mandrel during the parison drop. This saves raw material in straight sections. It also thickens the plastic at critical stress points, like the neck or base.
| Parameter | Function | Impact on Outcome |
| Temperature Zones | Melts resin gradually via barrel heaters | Prevents degradation; ensures uniform flow and drop speed |
| Blow Pressure | Forces plastic against the cavity walls | Determines surface finish, detail replication, and shape accuracy |
| Cooling Time | Solidifies the part before ejection | Dictates cycle speed; prevents warping and post-mould shrinkage |
| WTC / APC | Adjusts parison thickness dynamically | Saves material volume; strengthens high-stress container points |
Troubleshooting Common Defects During Operation
Even the best operators face daily defects. A reliable Blow Moulding Machine still requires regular troubleshooting to maintain peak performance. Understanding root causes builds operational confidence and drastically reduces machine downtime.
Uneven Wall Thickness: You will usually trace this back to parison sag. If the melt temperature runs too high, the plastic stretches under its own weight. This makes the top thin and the bottom overly thick. It can also stem from incorrect die and mandrel alignment. Sometimes, a drafty production floor cools one side of the parison faster than the other.
Excessive Flash or Poor Seam Strength: These issues point directly to mechanical or pressure faults. You might have insufficient clamping force. If the mould slightly opens during blowing, the seam thickens and weakens. Your blow pressure could be excessively high, forcing plastic past the pinch-off areas. Alternatively, the pinch-off edges on your mould might be dull from wear.
Surface Blemishes or Moisture Streaks: You often see silver streaks when resin is inadequately dried. The trapped moisture boils into steam during extrusion. Surface blemishes also happen if condensation forms inside the mould cavity. Over-chilled cooling water frequently causes this condensation in highly humid factory environments. You must keep the mould temperature slightly above the room's dew point.
Actionable Rule: Always change only one parameter at a time. If you adjust blow pressure and melt temperature simultaneously, you cannot isolate the root cause accurately. Wait at least five cycles after a parameter change to observe the true result.
Preventive Maintenance and Operator Training Protocols
Long-term reliability depends heavily on strict preventive maintenance. You must implement organized protocols to mitigate operational risks. A well-maintained Blow Moulding Machine lasts decades. Neglected machines break down constantly and ruin production schedules.
Your daily routines set the foundation for success. You must purge the extruder properly during planned shutdowns. Leaving plastic inside a hot barrel causes severe carbon buildup. Always clean the mould vents with a soft tool to allow proper air escape. Blocked vents cause trapped air burns on the plastic. You must also check hydraulic fluid levels and monitor for visible hose leaks every single shift.
Monthly and quarterly routines require deeper mechanical inspections. Technicians should inspect ceramic heater bands for physical wear or loose wiring. They must calibrate pressure and temperature sensors to ensure HMI accuracy. Replacing worn hydraulic seals prevents unexpected pressure drops. You should also grease the tie bars and verify the parallelism of the machine platens.
Operator skill requirements vary drastically by role. Basic operators handle loading hoppers, boxing finished parts, and monitoring ejection jams. This requires only fundamental safety training. Technicians require advanced mechanical and software skills. They manage HMI programming, perform complex mould changeovers, and lead deep troubleshooting efforts. Distinguishing these roles helps you assign training resources effectively.
Evaluating Blow Moulding Machines Based on Operational Complexity
Choosing the right Blow Moulding Machine means evaluating your facility's operational complexity. You must align the machine's capabilities with your team's actual skill levels. Buying an overly complex machine for a novice team often guarantees failure.
First, assess the Human-Machine Interface (HMI) and automation levels. Does the machine offer an intuitive touchscreen interface? Look for systems that allow you to save pre-set recipes for different moulds. You want to load a profile with one click. Avoid older systems requiring tedious manual parameter input for every single production run.
Changeover efficiency is another crucial factor. Evaluate the physical ease of mould swapping and color changes. Does the machine feature quick-release water couplings? Are the die heads easy to dismantle and clean? Long changeover times severely damage your overall output in high-mix, low-volume production facilities.
Vendor support and Standard Operating Procedure (SOP) documentation matter immensely. A reliable manufacturer provides extensive, localized installation support. They offer rigorous on-site training for your staff. You should expect detailed troubleshooting documentation, such as comprehensive PDF parameter guides. Good vendors do not abandon you after equipment delivery.
Apply smart shortlisting logic before deciding. Prioritize machines matching your facility's current technical maturity. If skilled manual labor is scarce in your region, opt for higher automation. Features like fully integrated deflashing, auto-lubrication, and robotic part takeout will keep your production line moving without extra hands.
Conclusion
Operating a blow moulding machine requires a delicate, continuous balance. You must blend heavy mechanical precision with strict thermodynamic control. Consistent, documented maintenance protocols keep the process stable over the long term. Defect mitigation is an everyday reality that demands a methodical approach to problem-solving.
The easiest machine to operate is rarely the simplest or most basic piece of equipment. Instead, it is the one featuring intuitive software controls, highly consistent hardware performance, and robust vendor support. Complex features like Automated Parison Control actually make the operator's job significantly easier in the end.
We encourage you to request a full technical demo before deciding on a purchase. Review the standard operating procedures closely with potential equipment vendors. Consult an industrial engineer to fully assess your facility's utility readiness. Proper planning today guarantees a smoother, more profitable production line tomorrow.
FAQ
Q: How long does it take to train an operator for a blow moulding machine?
A: Basic operation tasks, like loading resin and monitoring ejection, take just a few days to master. Advanced operations require significantly more time. Parameter setting, mould changeovers, and in-depth troubleshooting typically demand weeks of hands-on training. You often need formal vendor certification to ensure safe and efficient handling.
Q: What is a typical cycle time for a blow moulding process?
A: Cycle times vary heavily based on product size, wall thickness, and mould cooling capacity. Small bottles might finish in just a few seconds. Large industrial containers can take several minutes to form, cool, and eject properly. Efficient cooling systems drastically reduce this duration.
Q: Can one operator run multiple blow moulding machines simultaneously?
A: Yes, one operator can manage multiple machines if they feature high automation. Systems with integrated trimming, auto-ejection, and automated conveyors require less manual intervention. However, if your process involves manual deflashing or frequent mould changeovers, an operator must focus entirely on a single machine.
Q: What is the difference in operating an Extrusion vs. Injection Blow Moulding machine?
A: Extrusion Blow Moulding (EBM) is a continuous process. You must carefully manage parison drops and manually or automatically trim the resulting flash. Injection Blow Moulding (IBM) is a multi-stage process. It relies on precise preform temperature conditioning before the stretch-blow phase. IBM typically yields flashless, scrap-free products.

 English